So I don't get yelled at by our readers :P
August 17, 2007
Laptop Cooling Mod Walkthrough
(I will post a baby video immediately after this post so just hang on, you baby-crazy people! Gotta keep some posts on here for the nerds out there.)
 My laptop gets hot. Really hot. When I'm running a resource-intense program I've seen the CPU (Central Processing Unit) temp hit 85 degrees Celsius. Keep in mind that 100 degrees is boiling on the old "C" side of the thermometer. Electrical tape is compromised at 85 degrees Celsius. Running a computer, if it runs and mine doesn't, at that temperature for very long will ruin your circuitry.
I purchased a cooler pad shortly after I bought my laptop (it's almost 3 years old). However, the poor design of the machine means that the cooling pad doesn't help much at all. Something had to be done.
Here was my progression of ideas, starting with the most obvious and moving steadily to "technical:"
I decided that if I were going to cut a hole in my laptop I may as well install a fan too. I tested the airflow of several fans I cannibalized from old motherboards and power supplies and selected a 12V .25A processor fan. It pushed almost as much air as both of my cooling pad fans combined...which can push 40cfm. Then I tested it with my laptop power supply to see if a 12 volt fan could handle 19.5 volts without immediately burning out. It did just fine.
 I removed the bottom cover from my laptop and made sure there would be room to put the fan in without getting in the way of screw holes or other components. There was room for the fan but there was no way it would fit completely flush with the bottom, which meant that I would probably have to increase the size of the risers on the laptop too. This wasn't necessarily a bad thing as it would allow more air into the case.
 I carefully drew in the fan dimensions and started cutting with a razor blade. The case appeared to be black plastic and I thought I could get a more controlled cut with a razor than with my dremel. However, the case turned out to be aluminum, which was surprising because it felt like sturdy plastic. I used my dremel with a grinding blade to cut a nice square and then trimmed the cut up with some jewelry files that Wifey had from some of her college art classes.
The cut turned out really nice, the fan fit so tight that I almost didn't need glue. I also found a fan cover in my boneyard (computer junk) that fit the fan perfectly to prevent accidentally getting fingers or anything else in the fan. I wired the fan into the main power supply right where it plugged into the motherboard and I had a working laptop fan.
 To increase the riser size I took 4 thumbscrews (handy aluminum case screws that you can get from any computer store) and glued them where the previous risers were, putting little rubber bumpers on the bottom to make them nonskid.
At this point it was pretty late at night but I tested long enough to determine that I had been successful. The CPU had a resting temperature of 52 and a 20 min load temp of 65. Compare this with an original metric of 55-60 and 80-85 under load. Pretty cool, literally. However, there were some things I hadn't thought of.
 I wanted the fan to only run if the laptop was on AC power. I assumed the battery charging mechanism would have diodes to prevent backflow of current from the battery towards the AC adapter port (where my fan drew). This was correct, so my fan only ran if it was plugged into the wall. What I didn't foresee, though it's obvious now, is that the fan would not turn off if the machine was powered down. The fan is also fairly loud. The ideal situation would be a potentiometer (POT) with an off position. Like a dimmer switch for a light that would control speed.
 The next day I stopped at radio shack and picked up some POTs for testing from their limited selection. I picked up a pack of about 10 POTs that were small enough to fit in a modem port. This was the only feasible place on my slimline laptop to fit a switch or POT. That case is tight (which is what caused the heat problem in the first place). I tested several pots on the laptop power supply. Bad news. None of them could handle the voltage. One of them almost started on fire. As a backup plan I went back to the boneyard and found a tiny switch that would fit perfectly in the modem port.
Then I talked to a guy at a local electronics supply store. He said they didn't make POTs that could handle 5 watts of power for any sustained time that small. The problem is basically the same problem that my laptop had in the first place: not enough surface area to get rid of the heat buildup. Oh well, speed control would be cool but it's not that necessary.
I tried to install the switch after our Wed study. The soldering and switch install went well. However, when I tried to close the case I couldn't get the additional wiring to fit anywhere. It was simply to cramped. At midnight I gave up for the night, too tired and frustrated at such a simple obstacle to make progress.
I revisited it last night and revised the wiring, closed the case and booted up the machine within about 45 minutes.
 Summary: I define the project as a success. It looks pretty nice, considering the size of the fan I installed. It keeps the laptop up to 25 degrees cooler (that is a LOT). Eventually, under load the heat will build up but if you take the load off the CPU the temp drops back down at the rate of about 2 degrees per 5 seconds. I also like the increased height. The keyboard is much more comfortable to type on, which was a positive side effect. Keep in mind that the fan isn't even installed on the CPU, it's installed on the GPU, which I suspect is far cooler but I have no way to measure it. I recommend not cutting into an 1,500 laptop if possible, but if heat is gonna kill your machine anyway....go for it :)
Image captions and notes:
 My laptop gets hot. Really hot. When I'm running a resource-intense program I've seen the CPU (Central Processing Unit) temp hit 85 degrees Celsius. Keep in mind that 100 degrees is boiling on the old "C" side of the thermometer. Electrical tape is compromised at 85 degrees Celsius. Running a computer, if it runs and mine doesn't, at that temperature for very long will ruin your circuitry.
I purchased a cooler pad shortly after I bought my laptop (it's almost 3 years old). However, the poor design of the machine means that the cooling pad doesn't help much at all. Something had to be done.
Here was my progression of ideas, starting with the most obvious and moving steadily to "technical:"
- Buy a cooling pad: didn't change the temp more than 3 degrees
- Replace the thermal paste: this did conduct the heat from the circuitry to the heatsinks better but the heatsinks were still not dissipating the heat quickly enough.
- Build an external fan: I built a small fan unit that assisted the internal fan by sucking more air from the exhaust port. This didn't work for two reasons. A: the moronic engineers allowed the monitor to cover 1/3 of the exhaust port while open, eliminating the ability to place an extra fan on the exhaust. B: it still didn't pull enough air and was inconvenient, requiring an additional power source.
I decided that if I were going to cut a hole in my laptop I may as well install a fan too. I tested the airflow of several fans I cannibalized from old motherboards and power supplies and selected a 12V .25A processor fan. It pushed almost as much air as both of my cooling pad fans combined...which can push 40cfm. Then I tested it with my laptop power supply to see if a 12 volt fan could handle 19.5 volts without immediately burning out. It did just fine.
 I removed the bottom cover from my laptop and made sure there would be room to put the fan in without getting in the way of screw holes or other components. There was room for the fan but there was no way it would fit completely flush with the bottom, which meant that I would probably have to increase the size of the risers on the laptop too. This wasn't necessarily a bad thing as it would allow more air into the case.
 I carefully drew in the fan dimensions and started cutting with a razor blade. The case appeared to be black plastic and I thought I could get a more controlled cut with a razor than with my dremel. However, the case turned out to be aluminum, which was surprising because it felt like sturdy plastic. I used my dremel with a grinding blade to cut a nice square and then trimmed the cut up with some jewelry files that Wifey had from some of her college art classes.
The cut turned out really nice, the fan fit so tight that I almost didn't need glue. I also found a fan cover in my boneyard (computer junk) that fit the fan perfectly to prevent accidentally getting fingers or anything else in the fan. I wired the fan into the main power supply right where it plugged into the motherboard and I had a working laptop fan.
 To increase the riser size I took 4 thumbscrews (handy aluminum case screws that you can get from any computer store) and glued them where the previous risers were, putting little rubber bumpers on the bottom to make them nonskid.
At this point it was pretty late at night but I tested long enough to determine that I had been successful. The CPU had a resting temperature of 52 and a 20 min load temp of 65. Compare this with an original metric of 55-60 and 80-85 under load. Pretty cool, literally. However, there were some things I hadn't thought of.
 I wanted the fan to only run if the laptop was on AC power. I assumed the battery charging mechanism would have diodes to prevent backflow of current from the battery towards the AC adapter port (where my fan drew). This was correct, so my fan only ran if it was plugged into the wall. What I didn't foresee, though it's obvious now, is that the fan would not turn off if the machine was powered down. The fan is also fairly loud. The ideal situation would be a potentiometer (POT) with an off position. Like a dimmer switch for a light that would control speed.
 The next day I stopped at radio shack and picked up some POTs for testing from their limited selection. I picked up a pack of about 10 POTs that were small enough to fit in a modem port. This was the only feasible place on my slimline laptop to fit a switch or POT. That case is tight (which is what caused the heat problem in the first place). I tested several pots on the laptop power supply. Bad news. None of them could handle the voltage. One of them almost started on fire. As a backup plan I went back to the boneyard and found a tiny switch that would fit perfectly in the modem port.
Then I talked to a guy at a local electronics supply store. He said they didn't make POTs that could handle 5 watts of power for any sustained time that small. The problem is basically the same problem that my laptop had in the first place: not enough surface area to get rid of the heat buildup. Oh well, speed control would be cool but it's not that necessary.
I tried to install the switch after our Wed study. The soldering and switch install went well. However, when I tried to close the case I couldn't get the additional wiring to fit anywhere. It was simply to cramped. At midnight I gave up for the night, too tired and frustrated at such a simple obstacle to make progress.
I revisited it last night and revised the wiring, closed the case and booted up the machine within about 45 minutes.
 Summary: I define the project as a success. It looks pretty nice, considering the size of the fan I installed. It keeps the laptop up to 25 degrees cooler (that is a LOT). Eventually, under load the heat will build up but if you take the load off the CPU the temp drops back down at the rate of about 2 degrees per 5 seconds. I also like the increased height. The keyboard is much more comfortable to type on, which was a positive side effect. Keep in mind that the fan isn't even installed on the CPU, it's installed on the GPU, which I suspect is far cooler but I have no way to measure it. I recommend not cutting into an 1,500 laptop if possible, but if heat is gonna kill your machine anyway....go for it :)
Image captions and notes:
- The processor with heatsink removed...applying new thermal paste (arctic silver).
- The fan and the location penciled in. I had already started to cut out the vent. Notice how poorly designed the vents are to actually get any airflow.
- The cutout, before smoothing with files.
- The fan, grill installed and mounted in case. Also, you can see the risers.
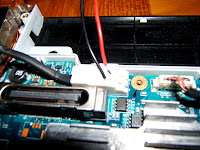
- Motherboard. You can see the CPU with heatsink and CPU fan remounted. GPU heatsink is the large silver thing. The fan sits directly above the angled fins. The AC power cord is sticking up into the air, it crosses over the top of the CPU fan.
- How I initially tapped into the power without soldering. I didn't want to solder on my actual motherboard. I had to change this method but I still did it without solder. I did solder the fan wires and switches, just no superheated metal near the motherboard.
- The completed laptop as it sits on the table, the fan hangs a few millimeters from the table at a slight angle so it's not trying to draw directly from the surface under it.
August 16, 2007
Anti-Anti-Bacterial
Using anti-bacterial soap at your house is a good thing, right? It sounds good. And anti-bacterial products fill the cleaning aisle at your local grocery store.
However, these products have a significant negative impact that is similar to the problem that overuse of antibiotics cause: bacterial mutation and decreased natural immunities.
Anti-bacterial soap typically uses Triclosen, which penetrates the cell wall of bacteria and kills something inside of it. The more often this occurs, the more likely that bacteria will adapt to resist this, which could reduce the effectiveness of many things that are supposed to kill bacteria when you really need to kill bacteria.
Remember in history class when you read about the Native Americans and how many were killed by diseases the Europeans brought? The locals had no immunity because they'd never been exposed to those diseases. We can recreate that effect to some extent by constantly disinfecting our surroundings and reducing our immunities while potentially strengthening the local bacteria.
Moral of the story: don't get all OCD with the Lysol and Purel. You were intelligently designed to resist the other elements in your environment long before convenient hand and counter-top sanitizers were invented. We should probably be more concerned about breathing the gases released by your car interior or the lead content in Fisher Price toys than the bacteria that 's hanging out on your doorknobs, toilet seats and counter-tops.
(read a study about this)
Now, excuse me. It's time for me to go feed Nora some dirt.
August 14, 2007
Get Rich Quick Scheme #3,654
A quick departure from baby pics for a geeky post:
Are you a slacker? Have you ever wanted to get rich quick but don't like to work for it? Let local children work for you!
Google has just released their Business Referral Program. Here's the summary of the program: Google is trying to increase their business listings on their Maps and Adwords properties with their obviously deep pockets. They will pay you $2 for each business in your local community that you provide information (such as hours and payment methods) about. You also must take a digital photo of the business. They send a postcard to the business asking them to confirm the data. If the business confirms the information you get another $8. So, you can potentially gain $10 per business listing that you supply.
Here's an equation I came up with to describe your potential riches (remember highschool math?):
d = ((n*p)*10) + ((n*(1-p))*2)
where n = business info collected
where d = desired earnings
where p = percentage business response
Here's how you leverage it. Recruit a few hundred kids from your local youth group or school. Create a treasure hunt contest where teams of a few kids go from street to street filling out a form and taking a photo with mommy's digital camera. The kids get one week to get as many sheets filled out as possible. Sheets can be turned in any time during the week. Any duplicate businesses only count on the first sheet to be handed in. Kids do not have to stay in their community. Create a few cheesy prizes based on total business sheets collected to give them a reason to compete.
Entering the data should only take a minute per sheet if you have decent typing skills.
Buy yourself something nice with the resulting treasure. Remember Jump Rope For Heart or those Magazine Subscription deals that elementary schools always sucker parents into? This is like that only you get rich :)
obligatory baby pic:

August 13, 2007
Write Your Own Caption
 Kristy shot this while Nora was in mid yawn. Turned out pretty funny. She looks real mad like.
I'm sure you visitors can come up with some funny captions in the comments section.
August 6, 2007
Videorific
(If you do not see a video window above this text you may need to install the latest version of macromedia flash)
Here's the first video of Nora. One Week old...sorry about the bad color quality. My video camera doesn't auto-adjust color very well and compression compounds the problem (I can give you a technical explanation of compression resampling if you really want it).
August 1, 2007
Nora Settles In

 Here are a few more pictures of our new little treasure. We are being discharged from the hospital today. It's a good thing because we were both getting a little stir-crazy in this little hospital room.
 I almost went back to work today but we have a lot of stuff to cart home and get settled. I plan on heading back to work tomorrow. I could take this whole week off but it's hard for me to go a whole week without working when I'm two minutes away from my job. Makes me antsy. Plus, we're hoping to take a trip to visit Wifey's family before the end of the year...gotta save a little vacation.
 We had several visitors while we were in the hospital. Thanks to everyone who came and visited. Thanks also for cards, gifts and warm wishes. If anyone is wondering if there's anything we need, yes there is: experience! You should see me trying to figure out how to clean the plumbing on something that's squirming, kicking and (sometimes) crying. Dressing the little squirmer is also a challenge.
Visitors are welcome, let us know you're coming and you don't need to bring anything!
Subscribe to:
Posts (Atom)

